I’m honestly a little bewildered that it has taken me four years of living in Wellington for me to actually visit the little Fix & Fogg window on Eva Street. This endearing little nook in the centre of Wellington is a hidden treasure. Specialising in sweet and savoury toasts, this little window shop sells New Zealand made Fix & Fogg peanut butter in all of its delightful flavours (including almond butter and the Everything Butter!). For those who don’t know much about this brand, they are a couple who started up the company and have maintained a hands-on process with the factory in Wellington since. The peanut butter began as the ‘Super Crunchy’ and the ‘Smooth’ and has flourished into a range including amazing flavours like Coffee and Maple, Smoke & Fire (savoury) and their most recent Chocolate Almond Butter (to die for!).
This award winning peanut butter is one of my favourites and my long overdue visit to their little Eva Street window in Wellington definitely consolidated my affection for this delicious spread. I bet you’re already wondering WHAT ON EARTH the beautiful creations above are! On the left is the PB, Banana, Date and Coconut Toast with Freeze Dried Raspberries. The best part – which I didn’t even realise until I got to the front of the line – is that you can choose ANY FLAVOUR to go on the toast. I chose Coffee and Maple and it was such a good combination with these other flavours.
Other toast toppings including the Smoke & Fire PB with pickle, a simple PB & Jam or sometimes there are cheeky specials up for grabs like this Marshmallow Chocolate Milkshake. As you can see, I was pretty happy with my little slice of toast here. For only $8 I had a breakfast that filled me up for most of the day and even had me saving some for later – that never happens! The bread they used was incredible and the toppings were definitely a decent amount for the money I paid. All around a cracker of a deal!
On top of this, the company is very eco-conscious and encourages you to bring back your jars to be refilled or recycled towards a brand new jar of PB. There is a little basket outside the Eva Street window to store your old ones. I actually have so many at home that it would require a trip or two to bring them down…
To celebrate their new Cashew Butter, they had a free Cashew Butter Cup with every purchase. See below for the gooey goodness that it was! This was such a treat but even without it, I loved my experience at the little treasure that is the Eva Street Fix & Fogg window. If you’re ever in Wellington and are an avid peanut butter lover like myself and my flatmates, then you have to get in on this action!
For now, have a wonderful day dreaming of this peanut buttery goodness! X
I am and have always been a bit of an average baker. I couldn’t tell you why, my baking endeavours just never seem to work out as well as I always hope. That being said, I have found myself a loophole to this awkward burden of mine: raw baking. Since trying to cut down on refined sugars and dairy, baking became somewhat of a difficult thing to do without having things in the cupboard like xanthum gum or flaxseeds, both of which were almost never just in my cupboard when I wanted to bake something. Moreover, I found that baking without eggs and butter was somewhat of a farse at first because the cakes never rose and texture was so dense. I resulted in a lot of polite faces when people would try my food. As a result, I basically only baked banana bread for ages because every baking attempt I made was always disappointing. Don’t get me wrong, banana bread is fantastic, but when pancakes become a difficulty for me it began to get a little ridiculous.
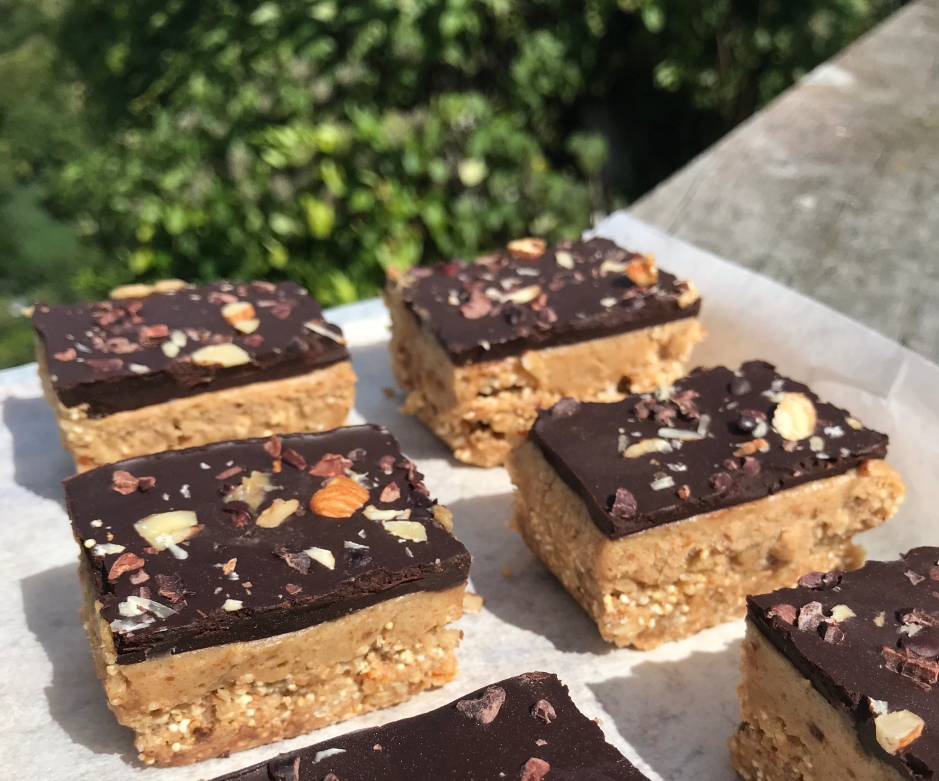
I digress! Raw food has shown me the light of “baking” and I have officially curated my FIRST recipe, made completely from scratch. Typically I would make a recipe from the skeleton of one or several similar recipes that I found online for inspiration, but not this one! This Chocolate Tahini Slice is my very own creation and I am THRILLED how it has turned out. Much like my previous post DF Peanut Butter Chocolate Fudge and the secret pumpkin, I wasn’t originally the biggest fan of the central ingredient of this recipe: tahini. I frankly thought it tasted like dirt and couldn’t believe it was so popular online. However, I have since made several recipes using tahini after seeing a creamy vegan pasta recipe by Sarah’s Day and my mind has been changed. Although, admittedly having said that, I still have to use copious amounts of lemon or something sweet to cover the earthy taste of tahini.
So, what is tahini? It’s essentially a sesame seed version of nut butter, I guess. It’s used in familiar foods like hummus and caters for those who aren’t huge peanut butter fans. Although I was rather rude about the taste, it is inherently less sweet than other butters and is slightly more bitter. It is widely used in dips, dressings and hidden in desserts like my own. I’ll pop some redeeming factors in a list below before quickly getting to the good stuff, the recipe!
Great in salad dressings, sauces and even on toast.
High in healthy fats, so super great for heart health.
Packed with vitamins, high in calcium, zinc (up to 12% of your daily intake) and magnesium (great for women’s health!)
Supports cognitive brain function.
High in antioxidants, particularly assistance with reducing inflammation.
A great detoxifying ingredient! Tahini contains compounds that help regulate kidney and liver function.
Better yet, this slice is actually packed with protein. The crust has protein powder, nuts and aramanth puffs in which also provide loads of healthy fats, fibre and protein to get you through the day. Therefore, this recipe is the perfect belly-filler.
INGREDIENTS
THE CRUST
1/4 cup dates, soaked
1/4 cup coconut oil
1 scoop protein powder
1/2 cup almond meal (could use nut-free substitute)
1 cup oat flour
1/2 cup amaranth puffs
1/2 tsp cinnamon
1 tbsp brown rice malt syrup
1/4 tsp salt
THE FILLING & TOP LAYER
1/2 cup dates, soaked
1 heaped tbsp tahini
1/4 cup brown rice malt syrup
1/3 cup coconut oil
1/2 cup coconut cream (the thick stuff of the top of the can)
125g dark chocolate, chopped and melted
Cacao nibs and sliced almonds, for topping
METHOD
To make the crust, blend together the dates, coconut oil, brown rice malt syrup and protein powder until smooth. In a separate bowl add the oat flour, amaranth puffs, salt and cinnamon. Combine the wet ingredients with dry until you can form a ball in your hands.
Line a rectangular pan with baking paper and place the crust mixture in the pan, flattening it with your fist. Place in the fridge while you make the caramel.
For the caramel, blend the dates, tahini, rice syrup and coconut oil until smooth. Remove the mixture from the blender and add to a bowl. Using a spoon, slowly add the coconut cream to the mixture, folding it in slowly to incorporate it in without melting it too much. If you have a slightly looser coconut cream and it isn’t that thick, add a little protein powder to the mixture to thicken it.
Once all of the coconut cream is incorporated, take the crust out of the fridge and pour the caramel on top. Place in the fridge for up to an hour before adding the melted chocolate.
Melt the chocolate with a little coconut oil to make the cutting process easier once the slice is complete.
Once the caramel is set slightly, add the melted chocolate and leave in the fridge for the chocolate to set. This will take up to a couple of hours. You can add any toppings you like at this point. I used cacao nibs and chopped almonds.
If you want a clean cut for your slices, use a hot knife and turn the slice over so that the crust is facing upwards. This will ensure that your chocolate layer doesn’t crack and your caramel doesn’t seep everywhere as you try to cut it!
Don’t eat them all at once! They lasted less than a couple of days in my house which is always a good sign, so if you want to keep them for yourself I suggest you hide them!
There is nothing nicer than sharing the kitchen with someone else and creating a meal together. Not only is it a wonderful shared experience, it is a 2-in-1 fun fest. You get to make the food together and eat the food together! Earlier this week, my flatmate and I attempted to re-make an eggplant dish we had tried a few weeks ago in place called Forbidden City in Lower Hutt with our other friends. This dish was absolutely heavenly and whatever they did to the eggplant made it simultaneously soft and gooey but crunchy on the outside. It was basically one of the best Chinese vegetarian dishes I have ever eaten. Naturally, my food-fanatic friend, Bronwyn and I tried to re-create this monumental discovery in our little kitchen at home and I reckon we did a pretty good job. While we did not quite achieve the juxtaposition of a crunchy outside versus the melt-in-your-mouth centre of the original eggplant dish, we definitely created something mouth watering and worthy of being sold in a takeaway restaurant. I am dying to share this recipe with you guys!!
Secondly, I am in somewhat of a dilemma over cauliflower rice. What do you guys think? I feel as though cauliflower has been adopted as the new blue-eyed baby of the fitness world but I genuinely cannot get on this bandwagon. I want to like it so badly that I keep trying it in an attempt to persuade myself that it is delicious. I haven’t quite got there yet. I will admit that this dish would be amazing with brown rice and that is where I am at with that. Nevertheless, the cauliflower rice is an excellent paleo/gluten-free/low-GI way of making this dish and enjoying all elements of the meal. There is crunch from the rice and sesame seeds, there is good ol’ greenery from the “zoodles” (my new favourite thing – I know, bit late on the bandwagon!), some salty-sweetness from the eggplant, freshness from the crisp spring onion topping, as well as some creamy element from the sauce. Although the pictures show a satay sauce paired with the dish, I am of the mind that a tahini dressing would go down a treat too…maybe even just a glug of sweet chilli sauce would do the trick too!
Anyway, I will stop teasing you with all of these visuals and adjectives give you the recipe already!
INGREDIENTS
Serves 2-3
THE EGGPLANT
2 medium eggplants
1/4 cup salt
1/4 cup cornflour
3 cloves garlic, minced
1/2 cup reduced salt soy sauce
1/2 onion, sliced
1 tsp coconut sugar
1-2 tbsp Maple syrup/sweet chilli sauce
1 tbsp sweet soy sauce
1/2 cup coconut oil, for frying
Sesame oil, for frying
1/2 tsp Chilli flakes
1 tbsp Cornflour (+water — to paste/slurry)
Water (to desired consistency)
Pepper to taste
THE CAULIFLOWER RICE & Zoodles
1/2 cauliflower
1 tsp chilli flakes
1 tsp curry powder
Salt and pepper to taste
Sesame oil, for frying
2 zucchinis, spiralised
Sesame seeds, toasted
Spring onions, for garnish.
METHOD
First, cut the eggplants into 1-inch cubes and place in a large metal bowl. Then coat the eggplant in salt and leave until at least 1/2 cup liquid has formed at the bottom of the bowl. Drain the liquid from the bowl and add the cornflour to the eggplant, covering all pieces evenly.
Meanwhile, blend the cauliflower florets in a blender until finely chopped. Place in a separate bowl and season with the spices and salt and pepper to taste. Leave aside for frying at the last minute.
To make the sauce for the eggplant, add sesame oil to a heated pan and add the onions and garlic to fry until softened and fragrant. Follow by adding the soy sauce, coconut sugar and sweet chilli (or maple syrup if using).
Make a slurry or paste with the cornflour and some water. Continue to simmer the soy mixture as you add the cornflour paste to the pot. This will help the sauce to thicken, so reduce to a low heat and allow the sauce to thicken until it covers the back of a wooden spoon. You can also add your chilli flakes and any other seasoning at this point.
Once thickened, put the sauce aside. Heat a new pan and add the coconut oil until melted. Once the oil is simmering, add the pieces of eggplant approximately 5-8 at a time, depending on the size of your pot. Allow to fry in the oil until browned on all sides. Approximately 5 minutes.
Once all pieces are fried, add them to the sauce and re-heat the mixture until all pieces are well covered in the soy sauce.
At this point, heat oil in a pan and add the zoodles and a minced garlic clove to a large frying pan. Allow the zoodles to soften before you remove them from the pan. Add some extra chilli flakes at this point too. Finally, place the cauliflower rice in the same pan and fry up until some of the moisture has been removed.
PLATING UP AND EATING.
Now, this recipe is obviously something I will spend the rest of my days trying to perfect. The likely story is that the original recipe has a lot more sugar and unhealthy additives than this recipe in order to get such a gloopy, caramelised and melt-in-your-mouth texture for the eggplant. Either way, this is a great attempt and would make an amazing side dish or poké bowl component on its own alongside some tofu, rice and fresh slaw. The opportunities are endless! I have provided you with the fuel, now it is your turn to take this recipe and alter it as you see fit.
The perfect way to illustrate how pumpkin can sometimes make me feel was my flatmate saying “you can have the other half of my pumpkin, I was traumatised trying to cut that thing up!” It seems a little dramatic at first but then you try to conquer a pumpkin yourself and then you get it. I don’t LOVE it, it honestly tastes a little strange to me and I would prefer sweet potato over it any dat. Having said that, when I baked it really simply and then puréed it, I found it subdued the taste a lot and was super useful to chuck in things like smoothies, pancakes, cookies and fudge! I know – it sounds a bit weird but half of the time you don’t even taste it. It has definitely changed my outlook on using pumpkin and it is the perfect way to sneak more of your daily veg into your diet/trick yourself into eating more vegetables, hehe.
So, yeah this recipe was generally made because I was desperate to get rid of the last of my pumpkin purée but it actually turned out amazing and delicious. I am now addicted and have to hide it at the back of the fridge so that I don’t eat it all. It’s very high in healthy fats and has quite a bit of maple syrup in it so it probably is best in moderation…right?
INGREDIENTS
FUDGE:
1/2 cup refined coconut oil, melted
1/2 heaped cup smooth peanut butter or nut butter of choice
1/3 cup pumpkin purée
1/3 cup maple syrup can also use honey
2 teaspoons cinnamon
1 teaspoon vanilla extract
⅛ teaspoon sea salt
CHOCOLATE SWIRL
1/4 cup coconut oil, melted
2-3 heaps tablespoons cocoa powder
1/8 cup maple syrup
METHOD
Melt coconut oil in a saucepan over medium-low heat or in the microwave for about 30 seconds to a minute.
Whisk in the nut butter, pumpkin puree, maple syrup, cinnamon, vanilla extract and salt until completely smooth.
Pour mixture into a lined pan. Add dollops of the chocolate mixture and use a toothpick to create a swirl design of your own.
Refrigerate until chilled and firm, about 2 hours.
Using a sharp knife, cut into squares.
Store in the refrigerator.
This will go pretty soft outside of the fridge so get your hands on it quick if it finds its way out of the cold. Also, if you want it a little firmer it would also sit happily in the freezer. Generally these will last for up to a couple of weeks, if no-one has eaten them by then. See how it goes! I hope you love them as much as me.
I’ll be honest with you, this curry was not planned. My flatmate and I set out to cook a curry of some description with little idea of what ingredients we had or what kind of curry we were going to cook. We didn’t even remember we had no curry paste between us except for a little bit of green curry paste in the cupboard. Essentially, I came upon this recipe by chance and, admittedly, I have had to mould the recipe from memory. Nevertheless, the end flavour was definitely unique and delicious. The addition of banana and mango sweetens the dish to compliment and lift the generally bland flavour of chickpeas and potato. Indeed, it took a little tweaking at first because the mango we had wasn’t quite as sweet as we had hoped. If you have a very fresh and sweet mango, you may not even need the banana. However, if you have a banana handy definitely fry it up to put on top – trust me! It is divine, just like I did for my Black Bean Soup.
This recipe isn’t for your typical curry. I would say it fuses flavours from the heat of traditional Indian curries and the hint of sweetness drawn from Caribbean-inspired dishes. I really, honestly had no idea what I was creating but this is generally how I have come upon most of my recipes! That being said, it is a very creamy and more-ish dish, perfect with rice and even on its own. I love the kick of sweetness that the mango and banana give to the meal, providing a new dimension of flavour, while the heat of chilli and spice of curry powder give an oomph and fragrance akin to your traditional yellow curry. Give it a go – let me know what you think in the comments!
INGREDIENTS
2 brown onions, sliced
2 cloves garlic, minced
1 thumb ginger, crushed
2-3 tbsp yellow curry paste
1 tsp cumin seeds
3 potatoes (sweet or regular), diced
1 carrot, sliced
1 yellow or orange capsicum, sliced
1 cup snow peas, stalks and ends removed
2 cans chickpeas, drained and rinsed
1 can coconut cream
2 cups vegetable stock
1/2 cup split red lentils
1/2 banana
1/2 mango
1 tbsp ground cumin
1 tsp turmeric
1 tbsp chilli flakes
Salt and pepper
To serve:
1 cup brown rice
2 cups warm water
Coriander or mint
Chilli flakes
Mango chutney
METHOD
Heat 1 tbsp oil in a large pan. Add the cumin seeds, garlic, ginger and curry paste and cook until fragrant.
Add the chopped onion and fry until browned. This will take 3-5 minutes.
Once the onions are soft, add the potatoes, carrot and lentils, immediately followed by the coconut cream. Stir all of the ingredients together and bring to a simmer.
Add the stock and capsicum, then bring it to the boil. Simmer for 15 minutes.
Gradually add the cumin, chilli and turmeric. Add more to your preferred taste if necessary.
While the curry boils, blend the mango and banana together, adding some of the curry sauce to loosen the mixture. Add the fruit to the pot.
Continue to simmer the mixture on a medium heat until all of the vegetables are well cooked and the lentils are soft. This will take around 30 minutes.
Season and add more spices to your particular taste.
Serve with brown rice, coriander and avocado or mango chutney.
Often the best way to explore Berlin is via a walking tour. It is better to embrace being a tourist in order to cover all of the historical checkpoints that cities like Berlin have to offer. In particular, the guides will tend to have loads of information about the history and will give a proper insight into the bones of the city. I elected to choose Sandemans New Europe‘s Berlin Free Tour. This tour is free but the guides request a donation or tip based on their performance and the quality of the tour. I loved this experience because our tour guide was friendly and very knowledgeable. We were taken to spots that we would have otherwise missed, such as the carpark which lies above Hitler’s bunker where he hid and died at the end of the war. This tour also takes you to typical checkpoints of Brandenburg Gate, the Memorial to the Murdered Jews of Europe, Checkpoint Charlie, Gendarmenmarkt and along segments of the Berlin Wall.
THE MEMORIAL TO THE MURDERED JEWS OF EUROPE
The history of Berlin owes a lot to the Second World War, where the infamous Holocaust, Third Reich and Hitler were commonplace names. Walking around Berlin, there are notable elements of this war that have not been covered up but acknowledged and stand out. The Holocaust Memorial, spanning across a large square, is a beautiful structure attributed towards the murdered Jews of Europe. I love this memorial because it does not try to cover up the reality of World War Two, nor does it try to paint it in a biased light. It has deep symbolic meaning that manifests itself differently among everyone who sees it. Amongst the tour group there were suggestions that the pillars represented each individual or group murdered in the Holocaust. Others suggested that they represented the sheer size and anonymity of those individuals in the massacre by covering such a large space. Each pillar is unique, one is a different height and size from the other, and the most astounding part is that as you walk into the depths of the memorial it becomes cold, eerie and quite an emotional experience. You get a real feel of the fear that those people must have felt, the anonymity of those killed and a true sense of loneliness despite being in the centre of a bustling city. It really was an experience not to be missed.
DURING THE DAY
WALK THE BERLIN WALL & SEE CHECKPOINT CHARLIE
The Berlin Wall is most likely the most renowned attraction of the German capital. You hear stories sitting in History class about the terrible separation of families and friends, the deaths that occurred when people from the East tried to escape, as well as the political tension between East and West well beyond the end of the Second World War. I love the picture below because it perfectly describes the “madness” of not just the wall itself but the huge power of politics over people, entire countries and even the world. The divide between East and West in Germany – isolated only to the City of Berlin – while the rest of the country was taken over by the West, was a true clash of ideologies. It is terrifying that ideology drove the government to physically restrict families from being together, keeping people from their work and their livelihoods.
Throughout the city, there are pieces of wall leftover from this period or stones in the concrete that show where the wall would have been. I must have crossed over the wall more times that I could count in one day which it showed that the separation of a city had severe consequences for those living in it. Checkpoint Charlie was quite a representation of this. Just beyond the Checkpoint on the “Western side” lies a McDonalds. Supposedly, when the wall came down in 1989, the McDonalds was inundated with customers from the East, who ran in hoards to this symbol of capitalism and commercialism after being subjected to communist practices for over 20 years. I find this juxtaposition incredibly symbolic and strangely candid.
VISIT THE BERLINER DOM & MUSEUM ISLAND
Museum Island is a UNSECO World Heritage site, home to five museums including the Berliner Dom. Berliner Dom translates to Berlin Cathedral. The building itself is an outstanding piece of architecture and displays a fantastic fresco inside the dome accompanied by vast wooden and gold structures which paint a vision of the grandeur and wealth. Moreover, for €7 you can gain entry to view the internal structures of the cathedral and witness an incredible panoramic view of the city of Berlin. We were very lucky to have such a clear day upon our visit and saw across the entire city from one spot.
FIND A PANORAMIC VIEW: TV TOWER
The view from the Berliner Dom is outstanding. However, the Berlin TV Tower also provides a much higher perspective for your viewing pleasure. I did not venture up that high as I was very satisfied with the view from the Berliner Dom. However, there is a bar on top of the TV Tower which may seem more appealing to some than a fresco over 100 years old.
EAT A PRETZEL
The pretzel has been mastered by the Germans over the years and there is often much debate as to it’s actual origin. Regardless, the soft and chewy dough that creates this wonderful and comforting snack is such a treat! If you around the city, I recommend you try one! I like the simple pretzel with salt on top, but you can find cheese-covered ones as well as sweet versions too. Go wild!
EVENING
GO TO AN AUTHENTIC GERMAN DINNER & DRINK A STEIN
As part of my Berlin experience, I wanted to try as much of the national food as possible. Being a vegetarian and vegan-in-progress, Germany isn’t exactly the most ideal destination for my dietary preferences. However, I was actually quite surprised at the range of foods that I could eat, even if it was comprised mostly of pretzels and other forms of bread. That being said, I managed to fit a few vegetarian versions of the delicacies of Germany. The “Currywurst” is a variation of sausage made by mixing pork sausage meat with curry powder. It isn’t everyone’s cup of tea, but the vegan version provided to us by Curry at the Wall for only €3 was such a great treat if you are still venturing through the city as evening falls or perhaps a pre-dinner snack.
Alternatively, the most genuine German culinary experience can be had at multiple places around the city. Anywhere that serves a good stein of beer and a selection of meats, cheeses and bread, will provide an authentic experience for your tastebuds.
CHRISTMAS MARKETS (Late November – December)
The Christmas markets were just beginning when I cam not Berlin for two days. From mid-November leading up to Christmas, the city begins to light up at night as these markets are constructed to provide nothing but joy and delicious treats for everyone! I won’t lie when I say that the Christmas markets on this trip were a huge contributing factor to the reason I booked it in the first place. I am a HUGE Christmas fan, so these markets provided me so much joy. The Christmas markets of Germany and Bavaria and known worldwide to be particularly special and I can vouch for this. The entire atmosphere provided by these wonderful constructions in the icy cold of winter is warming and comforting to the soul. Everything from pretzels and mulled wine (“glühwein”) to Christmas decorations and jewellery can be found at most of these markets spread across the city. So, if you are coming to Berlin in November or December, definitely add some of these markets to your list!
HAVE A GLUHWËIN
“Glühwein” or mulled wine is a huge part of the Christmas tradition in Germany and can be found at almost any stall in the city (even Curry at the Wall!). The hot spiced wine is flavoured with cinnamon, cloves and orange juice to create an alcoholic hug in a mug! It is a must-try, even just to warm your cold hands during the winter months. Although it isn’t everyone’s cup of tea, I was definitely drawn to trying a new one in each city to compare them, plus it was fun to say in German!
NIGHTLIFE
The nightlife of Berlin is particularly known to be highly energetic, wild and very exciting. There is a large techno and clubbing culture supported by Berlin’s nightlife, found predominantly in the East of the city. I had little exposure to this side of the city’s nightlife, however, there is a line of clubs opposite the PLUS Berlin Hostel where I stayed which provide an excellent dose of Berlin nightlife just a few minutes walk from your bedroom. Other districts that are good for clubbing include Kreuzberg and Friedrichshain which are not far from the most renowned club in the city, Berghain, across the river.
TRANSPORT
HIRE AN ELECTRIC BIKE AND RIDE ALONG THE RIVER
If you are on any transport apps such as Uber, then this is perfect for you. Throughout the city there are Jump electric bikes and scooters that you can hop on and ride along the roads and pavements of the city with such ease. Glide through the streets and along the river to the Reichstag to take in the beautiful architecture.
TAKE THE METRO/U-BAHN
Berlin transport is very efficient and easy to get around on. For a daily pass with Zones A, B and C, it is €7.70, which covers fees for the U-Bahn (Metro), S-Bahn (trains and trams) and buses. This is the best way of quickly getting around the city and seeing as much as you can in one day! Not too expensive but so worth it. 100% recommend. Just make sure you remember to validate it before getting on. Once it is validated you can use it all day! This is useful to have if you find yourself miles from your hostel or hotel with very sore feet from all of this walking.
As a pretext to this series of posts following my trip across some of the Northern and Eastern areas of Europe I will lay out the backstory of why it was such a whistle-stop tour. I elected to do a Contiki trip, specifically the Trail to Rome route, which took me through 10 cities in 2 weeks and across more countries in the process. From Rome, I continued on to Florence and then Zurich, finishing my journey back in London. It was the wildest 3 weeks of my entire life and I loved every single second. I spent no more than 2 nights in each city up until Rome, so that I quite literally covered each city in an evening, a full day and shot off to the next destination the following morning. Hence, I am doing a series of 24 hour “how-to guides” of tips and tricks and must-dos for each city I visited with the help of the Contiki experience as well as some of my own discoveries thanks to apps like Culture Trip and Maps.Me. So, without further ado. My first stop: Amsterdam. The capital city of the Netherlands, famous for it’s abundance of tulips, canals, coffeehouses and bicycles.
The Rijksmuseum and Vondel Park
I think when travelling Europe it is almost a given that you have to do at least one museum of some description in each city. Amsterdam’s greatest museum is found next to Vondel Park and next door to the Van Gogh museum, south of the city centre, with a vast exterior that resembles something of an old English private school or university building. Adult admission was €19, so quite a dent in your daily budget, but I would still vouch for this experience given the huge amount of artwork, sculpture and history found within the walls of this building, not to mention the three-storey library! Most well known to the museum is Rembrandt’s Nightwatch, currently under operation to discover more about the vast masterpiece painted in 1642. Aside from this, you will find multiple Van Gogh painting, including his own self-portrait. Once you’ve wandered the halls of the museum, you can walk around Vondel Park, which was adorned with a wonderful flea market and ice-rink when I was there in November. However, on the green there were groups playing football, families having lunch and people from all walks of life walking in the sunshine. Not to be missed!
The Flower Market (“Bloemenmarkt”)
While I thought tulips were a spring-flower, I was pleasantly surprised to find an entire strip of fresh tulips and tulip bulbs along the Singel river, most famously known as the “floating flower market”. A particularly colourful attraction, Bloemenmarkt will bring a smile to your face and you take in shades of tulip you’ve never seen or imagined before. Although you are unlikely to purchase tulip bulbs during your stay in Amsterdam, the experience is not to be missed. If you do plan to purchase some bulbs, be cautious. This area is highly touristy and scams often occur, you may not get what you are paying for. If you’re so lucky to visit during January when National Tulip Day where a temporary garden is created in the centre of Dam Square not far from this market area, or in April when the annual Tulip Festival takes place city-wide.
Why tulips you ask? Well, a brief history lesson showed me that tulips became so popular in the 16th century and the bulbs so prized they were used as currency for a time before the market crashed. Tulips offered the people of Holland their first economic bubble, otherwise known as “tulipomania”. Since, tulips have remained an icon of Holland and wider still in the Netherlands. Quite a pretty icon I must say. For more history, there is actually the Amsterdam Tulip Museum in the city too!
Visit A Coffeehouse
While it is all very well discussing the history and views of Amsterdam, there is another side to the culture of Amsterdam which is widely known worldwide: “coffeehouses”. Many people believe marijuana has been legalised but this is actually untrue. The use of cannabis has only be decriminalised for personal use within the confines of properties known as coffeeshops, which are quite literally just that. They are cafes that sell coffees, cakes as well as a vast selection of cannabis: pre-rolled joints, edibles or you can buy cannabis by the amount of up to 5 grams which is generally tolerated by the authorities. Whereas, other types of cannabis sales or transportation of prohibited in the Netherlands. Either way, you are liable for confiscation by authorities if the drug is found on your person. All that aside, the culture of visiting a coffeehouse during your visit to Amsterdam is very popular among both locals and tourists alike. Generally leave aside €10-15 if you intend to purchase any products during your visit. Otherwise, there is a great selection of different coffeehouses around the city which provide all kinds of vibes to suit your preference. My friends and I visited one near the Centraal Station right beside a canal called Siberie. It had the modern, clean coffeeshop interior of any café you might find in the likes of cities like Melbourne or Wellington. Take your pick, there is likely one on every corner.
Walk the Canals and see Dam Square
Walking the canals of Amsterdam is a given when visiting the city, but if the day is as good as it was when I was there, it is worth getting lost and following the canals around. In the centre of the city lies Dam Square, a hectic area where you will spend 5 minutes just trying to cross the zebra crossing because so many bicycles are coming out of nowhere and hoards of people are filing in from the tributaries of other areas of the city. Dam Square exhibits the awesome architecture beloved by Amsterdam fans and is a beautiful place to get some great panoramas.
VleminckX FRies To-Go
Fancy a spot of lunch? These fries will blow you away with their super crispy outside layer and an inside of fluffy, cloud-like potato which will melt in your mouth without all of the grease. The Dutch are apparently famous for combining French fries with mayonnaise so if this sounds like you then you have to try this place out. They also have loads of other toppings including Satay, Ketchup, Mayo and Onions (seen above). Hidden down a little street, not far from the Bloemenmarkt, VleminckX Fries is a small hole-in-the-wall shop that almost always has lines of people waiting to get their fried fix. Be prepared to practice your best Dutch and feast your eyes on the fast-food goodness in either small (€3.00), medium (€3.60) or large (€5.20) with over 25 different sauces to choose from. This is also perfect for the vegetarians among us, made without any contact with meat products and for only €0.30 you can get an extra sauce or a double portion too! If I have sold this place to you right then you’ll have already booked your flight and be halfway to Amsterdam by now.
Do a Canal Cruise
Try Stroopwaffel
On my journey, the trip manager shared with us a special dessert or sweet treat from each country. The Stroopwaffel is found everywhere in Amsterdam and is so good. It is essentially two very thin wafers help together by a gooey caramel layer. It is entirely indulgent and I managed to easily polish a pack off during the bus ride to Berlin. There was no way these gems would make it past another border.
THE RED LIGHT DISTRICT
The Red Light District or ‘De Wallen’ is one of Amsterdam’s most famous nightlife attractions and largest red light district. This area contains all sorts of entertainment activities for the adult eye as well as museums, exhibitions and concerts. Neon-lit in ethereal red and under the haze of marijuana clouds, the network of alleys are lined with women behind windows offering themselves for the night. The red lights used to act as symbols for brothels, therefore the name seems apt. Prostitution is legal and regulated in this way within the country, but for some the concept of the district may seem a little unfamiliar. Nevertheless, the experience for those open to the idea is worth it to see the culture. You are forbidden to take pictures along these red alleys but you could take a trip to the Sex Museum or Hash Museum. Other things to do and see including attending a show or going to a strip club, go to a coffeeshop or the condomerie for shapes of condoms you’d never have imagined. It isn’t for everyone but the whole Amsterdam requires somewhat of an open mind! Moreover, for the LGBTQ+ community the friendly ‘Warmoesstraat’ offers a vibrant array of clubs for the gay community.
Other Things to Explore…
Anne Frank Museum
The Heineken Museum
Van Gogh Museum
Best Apple Pie in the city (as rumour has it…): Winkel 43
Hire a Bike
I hope that you have enjoyed the first instalment of my Europe trip. This is certainly not the ultimate list of Amsterdam activities but you can fit a lot into a day in this beautiful, quirky and fun city. Walk or bike everywhere, push yourself out of your comfort zone and embrace this very chill and friendly culture!
Baking isn’t typically my forté, but if I know how to do one thing it is brownies. I think everyone has a general idea of what the perfect brownie looks and tastes like and I like my brownies super chocolatey, thick and definitely a little undercooked and preferably eaten the next day. Why? It is because eating them the next day means the second you sink your teeth into your first brownie it is like eating fudge. I think I prefer brownie this way because I am not a huge cake fan and I think brownies should be indulgent. Nothing says indulgent like fudge. Better yet? This entire recipe is VEGAN FRIENDLY. Yep, no butter, no eggs. Sadly, this isn’t one of those refined-free recipes, I think I have ultimately given up with my sugar-free refined-free baking attempts because they tend to always disappoint, but I think I have a happy medium with these absolutely delightful brownies.
I’m not sure what quite inspired me to put beetroot in the recipe other than the fact that they were 50c each at the market, it was a rainy Sunday afternoon and I had seen it done before by bakeries such as Little & Friday. So, I went on a search for the ultimate vegan version of the famous combination and came across one that I have adapted my recipe from. That recipe used nutmeg and no melted chocolate and I found the flavour to be far too earthy for me and I found the nutmeg with chocolate to be peculiar. Not quite the brownie I had pictured. I wanted to make a recipe that was indulgent, chocolatey and had the perfect consistency. The Nigella Lawson recipe I usually uses has such a fluid batter, so I thought adding more liquid might be the solution to my problem. I decided to add melted dark chocolate as I knew it would help create that perfect texture I was looking for and boost the chocolate flavour to balance the earthy beetroot taste. The chocolate chips were just a perk from leftover chocolate to be honest.
The result? Well, I think I might be sneaking beetroot into my brownies from now on because this recipe made a delicious chocolate treat and the beetroot flavour is masked just enough to coerce even the most health-averse to go back for seconds. Let me know what you think in the comments.
Ingredients
2-3 beetroots, peeled and diced
1 banana
160g dark chocolate
1/2 cup plain flour
1/2 cup wholemeal flour
1/2 cup cocoa powder
1 tsp baking powder
1 cup caster sugar
1/4 cup brown sugar + 1/2 cup boiling water (1/2 cup maple syrup)
1 tsp vanilla extract
Pinch of salt
METHOD
First, boil the beetroot cubes in a large pan until soft. Drain and blend into a pureé with the banana.
Preheat your oven to 180C and line a baking tray with baking paper.
Melt 60g of the dark chocolate. Chop the remaining chocolate into small pieces.
Add all of the dry ingredients to a large bowl, except for the dark chocolate, and mix well to combine.
If not using maple syrup, combine the brown sugar and boiling water in a bowl until the sugar has dissolved.
Add all of the wet ingredients to another bowl and stir until combined.
Mix the wet and dry ingredients together until smooth, then fold in the chocolate chips.
Pour the batter into the prepared pan and bake for 25-45 minutes or until the skewer comes out clean. If you use a deep dish, it may take longer than expected.
It’s cold, gloomy and dark by 5.30pm. You’ve had a long day under the clouds outside and all you are craving is some heartwarming food to eat while you wrap up in a blanket in front of your favourite Netflix show. Have I got your attention yet?
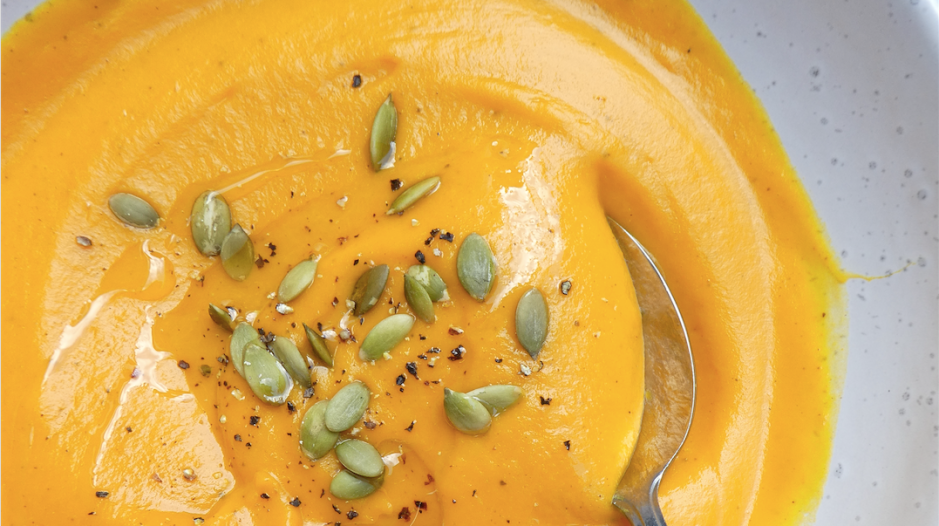
Well, this was me the other day and I came home to this pre-made soup and by the first spoonful I had already been transported to that blanketed bliss I had been dreaming of all day! It’s simple, requires very little effort to create and it is super, SUPER cheap to make. Frankly, I don’t know how you can go wrong. Dip a bit of bread in there, even top it with some coconut cream or avocado.
This soup has no nasties, nothing complicated. In fact, there are about 4 ingredients in total. What you see is what you get, really. The butternut squash is packed with all of those vitamins to help you get through the winter as well as enough fibre to keep your tummy happy and healthy.
I guess you could say this is a variation on your classic pumpkin soup, but I think pumpkin can sometimes be a little overpowering and well, pumkin-y. If you know what I mean? I think butternut squash is far sweeter and so in combination with the coconut milk it is quite a sweet soup that is extremely light and creamy and begging to be paid with some sourdough or a simple dukkah sprinkle. Yes please!!
I think the main selling point of this soup is how affordable it is to make. The squash cost me $3.00 at the vegetable markets this week; the coconut milk cost around $1.20; and then the garlic cloves and spices cost next to nothing when you do the maths. So, essentially this soup costs less than $5.00 to serve approximately 4 people, or enough to meal prep for at least 2-3 meals. Sold? I thought you might be. Anyway, enough chat. Here is the recipe:
INGREDIENTS
1 whole butternut squash
1 can coconut milk
2 garlic cloves
1 tbsp olive oil
1 tsp cinammon
1 tsp cumin
Salt and pepper
METHOD
Preheat the oven to 200C.
Cut the butternut squash into small cubes and place on a roasting tray with the 2 garlic cloves. Cover with oil and season with salt and pepper.
Place in the oven for approximately 20-30mins until soft.
Once cooled, add the squash and garlic to a blender with the coconut milk and spices until smooth and creamy.
Season to desired taste.
Heat and serve or place in the fridge/freezer for later on.
I told you it was simple! I won’t complicate things by going on about it – but you should really try this one out. Stay warm!!
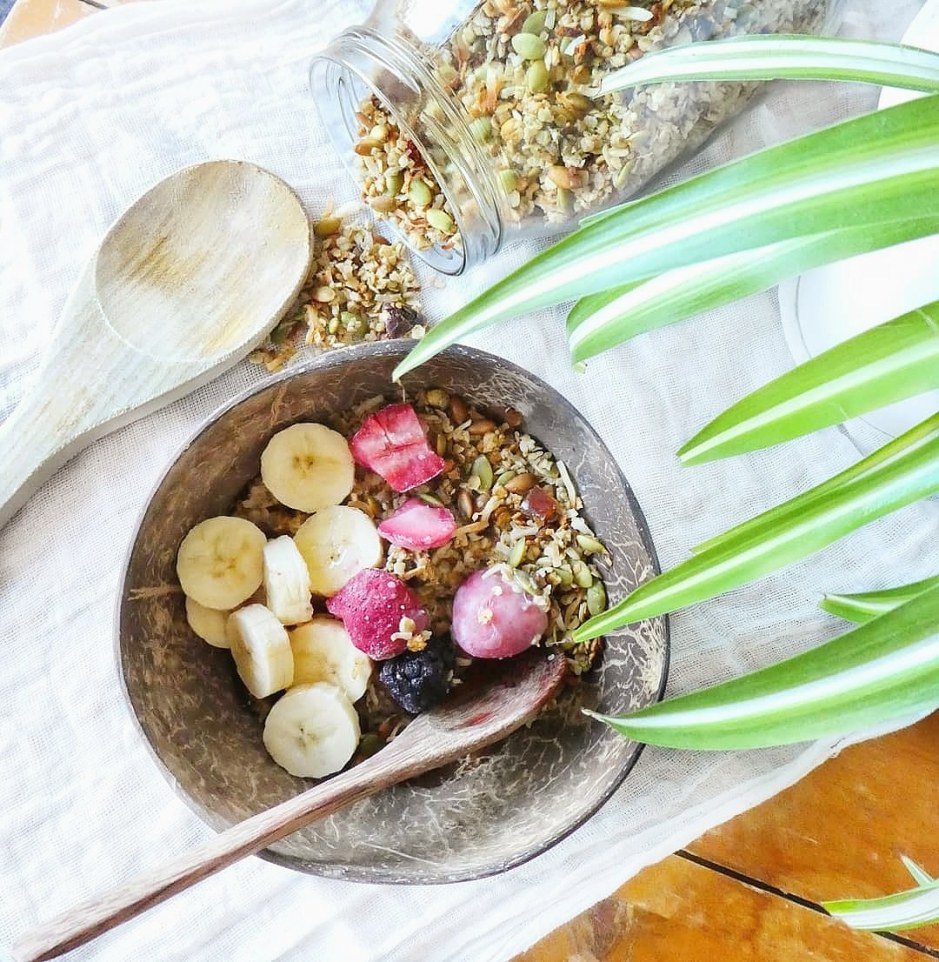
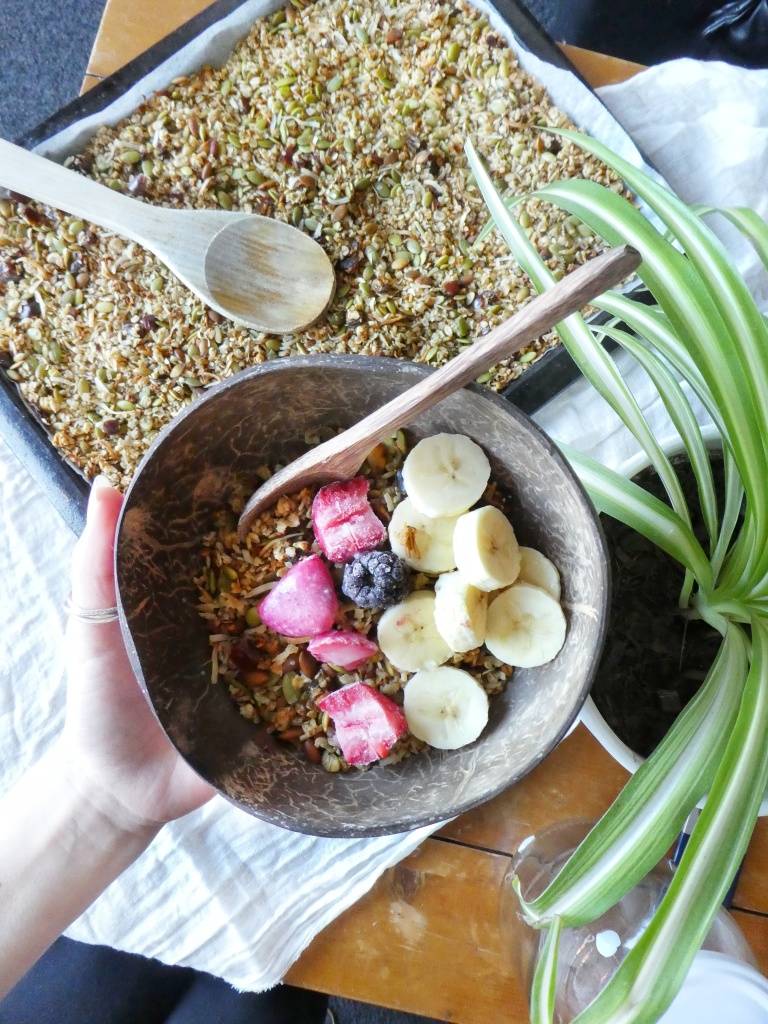
This unique recipe is actually something I discovered years ago but have only recently begun to make again, so I have taken an old recipe that I had on this blog and revamped it! I love granola but I find some of the shop bought stuff and the stuff you get in restaurants or cafes are so sweet and sugary that I can’t even finish a whole bowl. I guess that you could call this more of a muesli but I think it can be adapted to suit any preference.
The earl grey flavour initially caught my eye for being something quite special. The tea leaves are so fragrant and I love a good cup of tea so really nothing could go wrong. Earl Grey is a very fragrant type of tea and therefore it sort of makes sense that it would be used as a flavour. However, it’s because we associate it with only the hot, liquid type of Earl Grey, we think it strange to see an Earl Grey Sponge or Granola, nevertheless I was pleasantly surprised at the result of this recipe. The granola itself isn’t overpowering and the subtle sweet scent of the tea leaves permeate as the granola cooks and cools, leaving behind a delicious breakfast treat.
I like to switch things up a little for breakfast. One can get quite bored of the typical porridge or toast. As I have said before, I always like to try something new and as I had coincidentally run out of my last batch of granola I thought what a perfect opportunity to whip up a batch of this unique granola.I like to switch things up a little for breakfast. One can get quite bored of the typical porridge or toast. So, if you are a tea lover and want to try something a little bit different for your homemade granola, give this a go!
Ingredients
2 earl grey tea bags
1 cup boiling water
1/4 cup oil (I used coconut oil)
3 cups rolled oats
1/2 cup dates, finely chopped
1/4 cup sunflower seeds
1/2 cup pumpkin seeds
1/2 cup nuts of your choice
1 cup coconut threads
1/4 cup chia seeds
1 tsp ground cinnamon
1 tsp vanilla extract
zest and juice from a small(or 1/2 large) organic lemon
1/4 cup honey or rice malt syrup (optional)
Instructions
Preheat your oven to 175°C/350°F
Let 3 tsp loose leaf earl grey tea(in a tea ball) or 1 earl grey tea bag infuse 2/3 cup of boiling water for 5-15 minutes, depending on how strong you’d like it to be.
Mix rolled oats, coconut, seeds and nuts.
Mix the infused earl grey tea with the rest of the wet ingredients, except for the dates, in a saucepan over low heat until just melted.
Pour the wet ingredients over the dry and mix thoroughly.
Spread the granola on a baking tray lined with parchment paper.
Bake in the middle of the oven for 30 min or until golden brown. Stir the granola every 10 minutes.
Let the granola cool completely on the tray before you mix it with the dried berries and chopped white chocolate. Store in an airtight container in a cool and dry place.
Notes
The granola will still be a little soft when you take it out of the oven but it will get crispy once cooled completely. Serve with almond milk and top with seasonal fruits. It would be so good with fresh peaches or poached pears!! Let me know what you think.